Visual content holds a certain appeal that websites integrate images to every page, or even operate solely through photos. Now, with the new AJAX navigation menu widget, images can be added to the drop-down menu as well.
The AJAX navigation menu for blogger is a widget designed specifically for the Blogger platform. It is inspired from the Mashable website long before it was given a makeover. Despite the plain and simple inspiration, the drop down menu with images is a huge hit.
It works based on the jQuery library and Blogger JSON Feed API. Function-wise, it works just like a normal drop-down menu when JavaScript is disabled. For it to work online, a blog must be for public visitors, so the Blogger JSON Feed API will function as designed.
Features
Multi-Level Menu Support
The AJAX menu is a multi-level drop-down menu that is based on the standard unordered list of HTML. When a menu contains a sub-menu, it loads on the fly when a user rolls over the main menu. What is great about this is that it saves outgoing traffic, especially on a website that uses a large navigation.
Cross-browser Compatibility
Most AJAX applications will work across different browsers even with other plugins or proprietary technology already installed. The menu with images works in the same premise, instead of being designed for a specific browser. Because there is no telling which browser you or your blog readers would use, the new AJAX drop-down mega menu with images is the ideal option.
Some of the Windows browser supported includes IE5+, Firefox, Google Chrome, Safari Netscape 7+ and Opera 8+. When you're using a Mac, the AJAX menu is supported on Firefox, IE and Safari. If JavaScript is disabled, however, the menu is still accessible, but only as pure CSS menu.
Automatic Sub-Menu Display
With the new AJAX menu, you only need to roll over a menu item and sub-menus will automatically load. No need to click on a menu to get the sub-menu to drop down. This not only saves users' valuable navigation time, but also outgoing traffic.
Menu Styling
AJAX menus can be styled by simply changing the megamenu.js and the CSS style. The former is used when javaScript is turned on, while the latter is when it is turned off. You can adjust the menu parameters manually or you can use ready-to-use templates.
There are plenty of other features, but you would not be able to use or experience them if you do not install the new mega menu with images. What do you need to do then to implement it in your blog or website?
Adding Mega Menu with Images/Thumbnails in Blogger
Step 1. Log in to your Blogger account, then go to the Dashboard. Select the blog where you want to install the new mega menu.
CSS
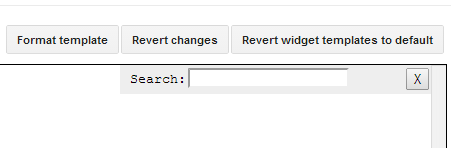
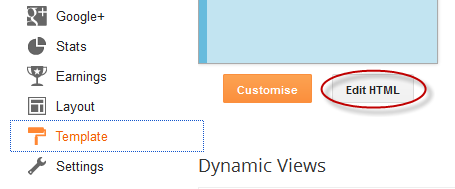
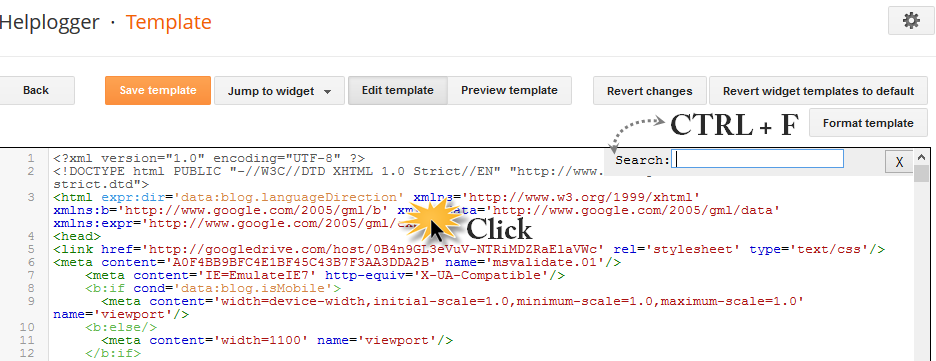
Step 2. Click on
Template, then press the
Edit HTML button. Press anywhere inside the code area and use the CTRL + F function to make your search quicker and easier. Type the following tag and hit Enter to find it:
]]></b:skin>
Once you find the tag, add the code below just above/before it:
.megamenu *{margin:0;padding:0;font-family:'PT Sans Narrow'}ul.megamenu{list-style:none;line-height:1;overflow:visible !important}ul.megamenu:after{margin:0;padding:0;content:' ';display:block;height:0px;clear:both}ul.megamenu li{float:left;display:inline;position:relative;text-transform:uppercase}ul.megamenu li a.menu-target:after{content:"";width:0;height:0;border-left:3px solid transparent;border-right:3px solid transparent;border-top:3px solid #fff;font-size:0;line-height:0;bottom:22px;right:5px;position:absolute}ul.megamenu li a{display:block;line-height:50px;padding:0px 20px;text-decoration:none;border-left:1px solid #000;box-shadow:1px 0 0 0 rgba(255, 255, 255, 0.1) inset;color:#d9d9d9;font-size:14px;transition:all 0.3s ease-in-out}ul.megamenu li a:hover{background:#111111;color:#fff}ul.megamenu ul{position:absolute;display:none;top:100%}ul.megamenu li:hover > ul{display:block}ul.megamenu ul li{z-index:72;min-width:149px;float:none;background:#000;text-shadow:none}ul.megamenu ul li a{text-transform:none;font-weight:normal}ul.megamenu ul li a:hover,ul.megamenuid ul li a.hover{background:#E0E0E0;color:#444}ul.megamenu ul ul{display:none;left:100%;top:0}ul.megamenuid li div.megasubmenu{background:#F9F9F9;position:absolute;width:830px;z-index:90;left:0;top:100%;overflow:hidden;min-height:150px;-moz-transform:translate(0,30px);-webkit-transform:translate(0,30px);-o-transform:translate(0,30px);transform:translate(0,30px);transform-origin:50% 0;visibility:hidden;opacity:0;color:#888;box-shadow:0 10px 7px -7px rgba(0,0,0,0.1);transition:all 0.3s ease-in-out}ul.megamenuid li:hover div.megasubmenu{visibility:visible;opacity:1;-moz-transform:translate(0,0);-webkit-transform:translate(0,0);-o-transform:translate(0,0);transform:translate(0,0)}ul.megamenuid ul,ul.megamenuid ul li{display:block !important;border:0 none !important;margin:0 !important;padding:0 !important}ul.megamenuid ul li{background:none !important;float:left !important}ul.megamenuid ul.leftmenulist{position:absolute;width:18%;left:0;top:0;bottom:0;background:#EEEEEE;border-right:1px dashed #e5e5e5 !important}ul.megamenuid ul.leftmenulist a{border-left:none !important;color:#555}ul.megamenuid ul.rightmenulist{position:relative;display:block;width:81%;float:right;margin:0px 0px 0px !important;background:none}ul.megamenuid ul.rightmenulist li{display:block;overflow:hidden;position:relative;min-height:210px;padding:5px 17px 5px 0px !important}ul.megamenuid ul.rightmenulist li .thumb-container{left:0;width:100%;height:100%;position:absolute;overflow:hidden;font-size:0;line-height:0}ul.megamenuid ul.rightmenulist li .thumb-container img{position:relative;top:10px;padding:0;width:100%;height:100%;display:block}ul.megamenuid ul.rightmenulist li a{display:block;border-left:none !important;padding:0px 5px !important;line-height:1.4;color:#777;font-weight:bold;font-size:14px}ul.megamenuid ul.rightmenulist li a:hover{color:#000;background:transparent}ul.megamenuid .loading-icon{background:url('https://blogger.googleusercontent.com/img/b/R29vZ2xl/AVvXsEgMGkVkjbOnLrfnU7P0_aeYlCgUUBJNzRaL2q7JE62SM56IVilkxfrTFk0FUKb2JhmoSF5SYW7xZIMDB0YGRSCDvkhd6fDW2ICVDxEydT6ZAXS9Q6YSlhCRYKZXsZCDa4B3tcZ5rj83CSI/s1600/wait.gif') no-repeat scroll 0 0 transparent;width:22px;height:22px;position:absolute;top:50%;margin-top:-11px;right:5px}ul.megamenuid .menu-icon{border-bottom:4px solid transparent;border-top:4px solid transparent;border-left:4px solid #777;display:block;height:0;margin-top:-4px;position:absolute;right:11px;top:50%;width:0}#megamenuid{background:rgba(0, 0, 0, 0) -moz-linear-gradient(center top , #3d3d3d, #212121) repeat scroll 0 0;background:-webkit-linear-gradient(top,#3d3d3d,#212121);background-color:#3d3d3d;box-shadow:1px 1px 0 0 rgba(255, 255, 255, 0.1) inset;height:50px;width:100%;position:relative;max-width:1000px;margin:0 auto;padding:0px}#megamenuid h5{font-size:16px;margin-top:70px;text-align:center}#megamenuid h5:before{content:"";position:absolute;top:50px;left:50%;width:5px;height:2px;margin-left:-4px;border-left:2px solid black;border-right:2px solid black}#megamenuid h5:after{content:"";position:absolute;top:55px;left:50%;width:10px;height:5px;margin-left:-7px;border-top:2px solid black;border-left:2px solid black;border-right:2px solid black;border-radius:8px 8px 0px 0px}li.search-box{float:right !important;line-height:35px;margin:7px 10px 0 0}li.search-box .search-field{border:none;padding:3px;background:#3F3F3F;color:#fff;width:135px;font-size:13px}li.search-box .search-field:focus{border:none;outline:none;background:#4C4C4C;color:#fff}li.search-box .search-button{background:url('https://blogger.googleusercontent.com/img/b/R29vZ2xl/AVvXsEh-E0_kDVlBL-esbH1FJlhLmB9f4K2CpEe5TNQB5doYOe1BEbCC93W5-u-cpyNE5xW2A0dhKTmbO0cI6KEByNoQEq8Xh6iDfQXpviutOAXPNLLZEWil6cqaExysXqhRvF4gj-xGkzp7KfA/s1600/search.png') no-repeat;border:none;cursor:pointer;padding:5px 10px;transition:all 0.3s ease-in-out}li.search-box .search-button:hover{opacity:0.9}.search-alert{background:#E84C3D url(https://blogger.googleusercontent.com/img/b/R29vZ2xl/AVvXsEg8YIJ77w9Qx4ePh8GrjqUp_bi172GgYA263IeKDl0Gtt5kqSSRFlyh30Pptup-opf_Lsf4BX2_sIZ8bc3Bk0Oddvli6uznBYtpVMe7-xUAMV004YqjrhouR-OjELI3oh60RBmF_E2KnC0/s1600/search-info.png) no-repeat;background-position:5px;text-transform:capitalize;color:#fff;margin:-5px;padding:0px 15px 0px 40px;display:none;border-radius:5px}
JavaScript
Step 3. Check if your blog has the jQuery plugin already installed. If not, you need to add a few lines of code before the
</head> tag (CTRL + F to find it). See the code below:
<script src='http://ajax.googleapis.com/ajax/libs/jquery/1.8.2/jquery.min.js' type='text/javascript'/>
<script type='text/javascript'>
//<![CDATA[
(function(e){var t=function(e,t){this.elem=e;this.settings=t;this.megaMenuHtml();this.ajaxcall=null;this.menulist=this.elem.find(".leftmenulist li a");this.menuHelper(this.elem);this.addEvents()};t.prototype={regex:{islabel:new RegExp("/search/label/","g"),issearch:new RegExp("[?&]q=","g"),labelsearch:new RegExp("(http://[^/]+)/search/label/([^/?&]+).*[?&]q=([^$&]+)(?:[^$]+)?","g"),label:new RegExp("(http://[^/]+)/search/label/([^/?&$]+)","g"),search:new RegExp("(http://[^/]+)/search/?[?&]q=(.*)","g")},addEvents:function(){var t=this;this.menulist.hover(function(){if(e(this).data("menuloaded")!=="true"){t.li=e(this);t.url=t.li.attr("href");t.container=t.li.closest("ul").siblings("ul");t.hoverOver()}},function(){t.hoverOut()})},hoverOver:function(){var t=this;this.getAJAXUrl();if(!this.ajaxUrl)return;this.ajaxcall=e.ajax({type:"GET",url:t.ajaxUrl,dataType:"jsonp",data:t.ajaxData,beforeSend:function(){t.showLoader()},success:function(e){t.hideLoader();t.addArrow();t.showPosts(e)},error:function(e){t.showError(e)}})},hoverOut:function(){this.ajaxcall.abort();this.hideLoader()},getAJAXUrl:function(){if(this.url){var e=this;this.ajaxData={alt:"json","max-results":this.settings.postsNumber};this.url.search(this.regex.islabel)!==-1&&this.url.search(this.regex.issearch)!==-1?this.ajaxUrl=this.url.replace(this.regex.labelsearch,function(t,n,r,i){e.ajaxData.q=i;return[n,"/feeds/posts/default/-/",r,"/"].join("")}):this.url.search(this.regex.islabel)!==-1&&this.url.search(this.regex.issearch)===-1?this.ajaxUrl=this.url.replace(this.regex.label,function(t,n,r){delete e.ajaxData.q;return[n,"/feeds/posts/default/-/",r,"/"].join("")}):this.url.search(this.regex.islabel)===-1&&this.url.search(this.regex.issearch)!==-1?this.ajaxUrl=this.url.replace(this.regex.search,function(t,n,r){e.ajaxData.q=r;return[n,"/feeds/posts/default"].join("")}):this.ajaxUrl=!1}else this.ajaxUrl=!1},showLoader:function(){e("<span></span>",{"class":"loading-icon"}).appendTo(this.li.closest("li"))},hideLoader:function(){this.li.closest("li").find("span.loading-icon").remove()},showPosts:function(t){var n=this,r=[],i,s,o;t.feed.openSearch$totalResults.$t>0?e.each(t.feed.entry,function(t,u){i=u.title.$t;e.each(u.link,function(e,t){t.rel==="alternate"?s=t.href:s="#"});o=u.media$thumbnail?u.media$thumbnail.url.replace(/\/s72\-c\//,"/s200-c/"):n.settings.noThumbnail;r.push('<li><span class="thumb-container"><a title="',i,'" href="',s,'"><img alt="',i,'" src="',o,'"/><br />',i,"</a></span></li>")}):r.push("<h5>","No posts available.","</h5>");this.container.html(r.join(""));this.menulist.removeData("menuloaded");this.li.data("menuloaded","true")},showError:function(e){if(e.statusText==="error"){this.hideLoader();this.addArrow();this.container.html("<h5>Oops... Could not fetch the blog posts.</h5>")}},addArrow:function(){this.menulist.closest("li").find("span").remove();this.menulist.removeClass("hover-menu");this.li.addClass("hover-menu");e("<span></span>",{"class":"menu-icon"}).appendTo(this.li.closest("li"))},menuHelper:function(t){var n=this;t.find(">li").hover(function(){var t=e(this);t.find("a:first").addClass("hover-menu");var r=e(this).find("ul.leftmenulist li").height()*e(this).find("ul.leftmenulist li").length;t.find("ul.rightmenulist").css({"min-height":r+"px"});n.requestFirstAjax(t)},function(){e(this).find("a:first").removeClass("hover-menu")})},megaMenuHtml:function(){this.elem.find("ul ul").remove();this.elem.addClass("megamenuid").find(">li").find("ul:first").addClass("leftmenulist").wrap(e("<div></div>",{"class":this.settings.divClass}));e("ul.leftmenulist").after(e("<ul></ul>",{"class":"rightmenulist"}))},requestFirstAjax:function(e){e=e.find(".leftmenulist li:first-child a");this.url=e.attr("href");this.container=e.closest("ul").siblings("ul");this.li=e;this.hoverOver()}};e.fn.megaBloggerMenu=function(n){var r={postsNumber:4,divClass:"megasubmenu",postsClass:"rightmenulist",noThumbnail:"/default.png"},i=e.extend({},r,n);return this.each(function(){var n=new t(e(this),i)})}})(jQuery);
//]]>
</script>
<script type='text/javascript'>
jQuery(document).ready(function($) {
$('#megamenuid').megaBloggerMenu({
postsNumber : 4,
noThumbnail : 'https://blogger.googleusercontent.com/img/b/R29vZ2xl/AVvXsEib3WnJLcn79fL-YvBBDDkzMGchL5T8FziUJu77ZcPMTEWDe39xbgPEO1ebwgdlcTDJNm738oNC0YrijN6SGTkDJEsskUtRBlwEwPnFZbico9S1_xrFAO298H7QpxryznwWAn0qPPNrNp0/s1600/no_image_available.png'
});
});
$(function(){
$('.search-here').submit(function(e){
if($('.search-box .search-field').val().length==0){
$('.search-box .search-alert').fadeIn().css('display','inline-block');
e.preventDefault();
}
});
});
</script>
Note- If jQuery plugin already exist, remove the line in red.
- To change the number of posts, change the 4 value from:
postsNumber : 4
- To add a different thumbnail when a post has no image, replace the url in blue from:
noThumbnail : 'https://blogger.googleusercontent.com/img/b/R29vZ2xl/AVvXsEib3WnJLcn79fL-YvBBDDkzMGchL5T8FziUJu77ZcPMTEWDe39xbgPEO1ebwgdlcTDJNm738oNC0YrijN6SGTkDJEsskUtRBlwEwPnFZbico9S1_xrFAO298H7QpxryznwWAn0qPPNrNp0/s1600/no_image_available.png'
HTML
Step 4. Carefully add the HTML code to ensure that the drop down menu with images will work as designed. There are only three types of URLs that the AJAX Menu accepts and they must be used accordingly.
Label URL:
http://yourblogurlblogspot.com/search/label/LABELNAMESearch Query:
http://yourblogurl.blogspot.com/search?q=SEARCHQUERYLabel w/ Search Query:
http://yourblogurl.blogspot.com/search/label/LABELNAME?q=SEARCHQUERYAmong the three URLs, the Search Query has to be URL encoded using a specific tool.
Step 5. Search the following line using CTRL + F:
<div class='main-outer'>
Just above this line, add the following HTML code:
<ul class='megamenu' id='megamenuid'>
<li><a href='/'>Home</a></li>
<li><a class='menu-target' href='#'>MENU TITLE</a>
<ul>
<li><a href='http://ADDURLHERE.com'>LABEL NAME</a></li>
<li><a href='http://ADDURLHERE.com'>LABEL NAME</a></li>
<li><a href='http://ADDURLHERE.com'>LABEL NAME</a></li>
</ul>
</li>
<li><a class='menu-target' href='#'>MENU TITLE</a>
<ul>
<li><a href='http://ADDURLHERE.com'>LABEL NAME</a></li>
<li><a href='http://ADDURLHERE.com'>LABEL NAME</a></li>
<li><a href='http://ADDURLHERE.com'>LABEL NAME</a></li>
</ul></li>
<li><a href='http://ADDURLHERE.com'>Normal Link</a></li>
<li class='search-box'>
<form action='/search' class='search-here' method='get'>
<input class='search-field' name='q' placeholder='Search Here' size='30' type='text'/>
<input class='search-button' type='submit' value=' '/>
</form>
<p class='search-alert'>Search form is empty!</p>
</li>
</ul>
<div class='clear'/>
<div class='clear'/>
Note: replace the text in blue with the label url and the text in red with the name of the label. This is the label that you have added to the Labels settings of your post editor:
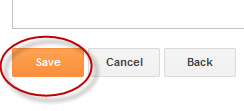
Step 6. Click on
Save template for all the changes to take effect.
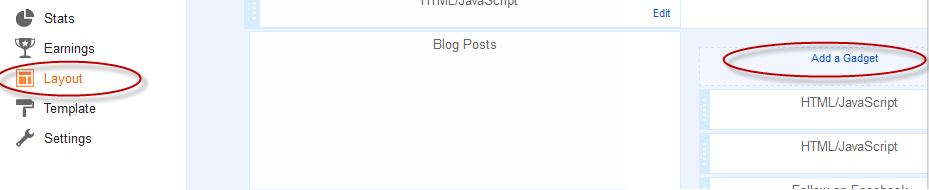
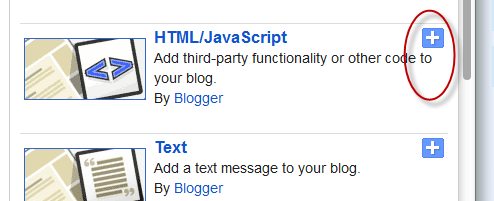
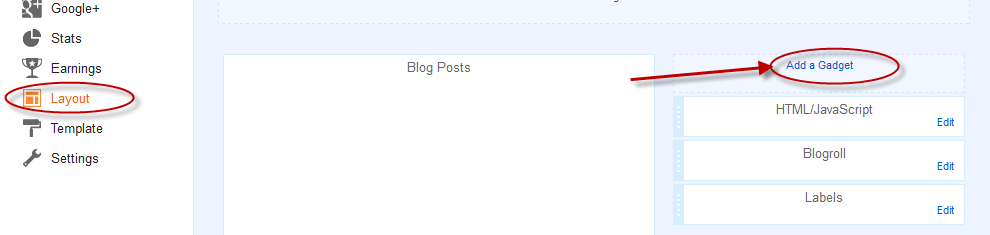
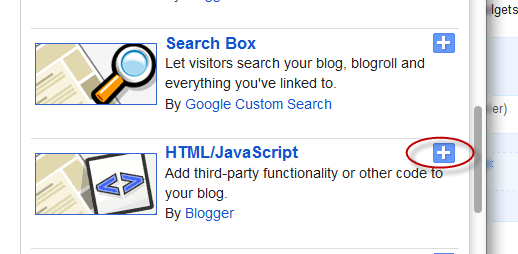
If you can't find the line from step 5, access the
Layout tab, click on
Add Gadget, and then choose
HTML/JavaScript Gadget. Copy the HTML code and paste it inside the box... then press the
Save button.
That's it!Once that is done, your AJAX menu with images will be implemented and ready for you to use. Make sure to choose photos that are relevant to the menu and sub-menus so your website will have cohesive look and appeal. Research shows, however, that text accompanied by any image, even if completely irrelevant, can grab attention.


 to Blogger")